
Small but mighty, the AeroPress has taken the coffee world by storm since its invention in 2005. This unassuming device looks a bit like a giant syringe, but don’t let its unconventional appearance fool you. It’s incredibly versatile, capable of brewing everything from an espresso-like concentrate to a full-bodied cup of filter coffee, all with minimal fuss and super-fast cleanup.
Whether you’re a seasoned coffee connoisseur or just looking for a quick, consistent, and delicious brew at home or on the go, the AeroPress might just become your new favorite method. Let’s get brewing!
A Little History: The Ingenious Mind Behind the AeroPress
The AeroPress wasn’t born in a traditional coffee lab. It was invented by Alan Adler, a Stanford engineering instructor and the mind behind the Aerobie flying ring. Frustrated by the bitterness and sediment in his daily coffee, he set out to create a better brewing device. His goal was simple: reduce bitterness, ensure quick brewing, and make cleanup a breeze. After countless prototypes and experiments, the AeroPress as we know it today was launched, quickly gaining a cult following for its innovative design and exceptional results. It truly brought an engineer’s precision to the art of coffee making.
Why the AeroPress is a Game-Changer
The AeroPress offers a unique combination of immersion and pressure brewing. The coffee grounds steep fully in hot water, much like a French Press, allowing for robust flavor development. Then, gentle air pressure is used to force the water through a small paper filter and the coffee grounds, extracting the brew quickly and cleanly. This dual approach results in a highly aromatic, intensely flavored, and remarkably smooth cup with very little acidity or bitterness. It’s also incredibly forgiving, making it perfect for beginners to achieve excellent results.
Step-by-Step Brewing Guide: The Standard Method
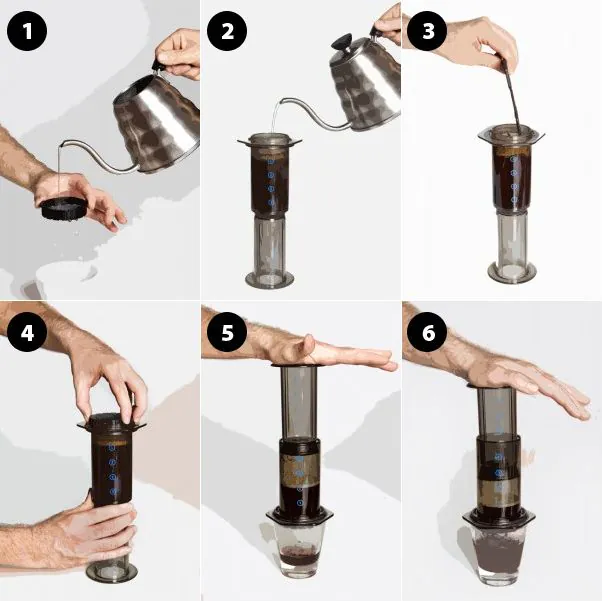
The most common way to brew with an AeroPress is called the “standard” method. It’s a great starting point for beginners and produces a fantastic cup every time.
- Prepare Your Filters
First, take one of the small, round paper filters and place it into the AeroPress filter cap. For a cleaner cup, many people prefer to rinse the filter with a little hot water. This removes any papery taste and preheats the filter cap, which helps maintain a stable brew temperature. After rinsing, twist the filter cap firmly onto the bottom of the main chamber.
- Set Up and Add Coffee
Next, place the assembled AeroPress chamber on top of your sturdy coffee mug. We recommend placing your mug and AeroPress on a digital scale and taring it to zero. Add one level scoop (about 15-17 grams) of your medium-fine ground coffee. Give the AeroPress a gentle shake to level the grounds.
- Add Water and Start the Brew
Start your timer and pour hot water (around 195-205°F / 90-96°C) into the chamber. You can either fill it to the number “1” for a single, strong cup or to the “2” for a larger, more diluted brew. A good starting point is to pour about 220 grams of water for a brew that is both rich and easy to drink.
- Stir and Steep
Using the included AeroPress paddle, stir the coffee and water for about 10 seconds to ensure all the grounds are fully saturated. This is a crucial step for even extraction. Place the plunger on top of the chamber, just enough to create a seal. This traps the aroma and prevents the water from dripping through too quickly.
- Press Slowly and Steadily
After a total brew time of about one to two minutes (you can experiment with this!), remove the plunger and press it down slowly and steadily. Don’t push too hard. The whole pressing motion should take about 20-30 seconds. Stop pressing once you hear a hissing sound, which indicates that all the water has been pushed through the grounds.
- Enjoy Your Brew!
Remove the AeroPress from your mug. If you brewed a concentrate (e.g., using less water), you can top it off with more hot water to your desired strength. Otherwise, your perfect cup is ready to enjoy immediately!
A Tip for Easy Cleanup: A quick push of the plunger over a trash can or compost bin will eject the neat, compact puck of coffee grounds, making cleanup incredibly fast and simple.
Pro Tip: The Inverted Method
For those who want to experiment, the “inverted” method is a popular alternative. You assemble the AeroPress upside down, which allows you to immerse the coffee for a longer time without any dripping. You then flip it over and press as usual. This can lead to a more flavorful, nuanced brew and is a fun way to explore the AeroPress’s versatility!
The AeroPress offers a beautiful combination of simplicity, speed, and quality. With a little practice, you’ll be brewing a rich, delicious cup that perfectly suits your mood. Happy brewing!
Watch a Pro in Action!
For a fantastic visual demonstration of these techniques, watch this video from a coffee expert.
https://www.youtube.com/watch?v=j6VlT_jUVPc&list=PLxz0FjZMVOl38lo5Z6pO2g3LhI_32pKiU&index=7